
Connection of Cups with Lining | Bustier Corset Sewing #8
- Tatiana Kozorovitsky

- Aug 14, 2021
- 3 min read
Updated: Sep 10, 2022

CLICK HERE TO DOWNLOAD THE PATTERN:
So, the foam cups are ready.

It is compulsory to compare the symmetricity of the cups and make sure that they are similar in size and in the position of the decorative tape.


However, the upper cuts of the foam cups are not finished. I will finish the upper cut with the lining.

Let’s sew the cup lining. You probably noticed that I didn’t use an iron: we pressed neither the corset pieces nor the cups. So, all the markings made with a write-erase pen are still visible. I postpone pressing to the time when all cup lining pieces are sewn. We will press and remove all markings then.

I remove pins, which join the pieces and start arranging the cup pieces as I plan to sew.
We start from the lower cup. I arrange the piece face together along the cuts between the points 2 and 3. We will sew the pieces of both cups in this position. Then we will attach the upper cup.


I stitch the lower cup along the curve 2-3 with seam allowance of 0.7 cm. I make bar tacks at the start and the end.


According to the theory it is necessary to press seam allowances open after both pieces are stitched.

However, to save time I use the following trick: I make two parallel stitching lines along the joining seam of the pieces on both sides in 1 mm from it and open seam allowance to both directions. Not only do these stitches not spoil the look, but, on the contrary, they create a decorative finish.


Let’s attach the upper cup. Align the notches 1, 2 and 4 along the lower cut of the upper cup with the corresponding notches on the lower cup.

I place the pinned pieces in the sewing machine, so that the lower cup is on top and stitch with seam allowance of 0.7 cm. I make bar tacks at the start and the end. The pieces are easy to join if your cutting is precise and you followed strictly seam allowance.


Let’s also make a decorative stitching line along the upper cup to maintain the same style. But in this case you should fold seam allowance upward and make stitching in 1 mm from the joining stitch. I don’t make bar tacks at the start and the end.

Well, the lining is ready.

Now we can press and remove all markings. I will try to press first without touching the marking for cup insertion. Then I will press the foam cups on the pressing molds with circular movements, barely touching the fabric, and give them a rounded shape. I press the cup lining on the mold after. All markings are removed. I let the cups dry on the molds.


The pressing is completed.

Now I need to finish the upper cut with the lining. I insert the lining into the cup, unfold the lace from the upper cup to open the upper cut, turn the lining over, arrange the foam cup and the lining face together and align them in the upper cut.


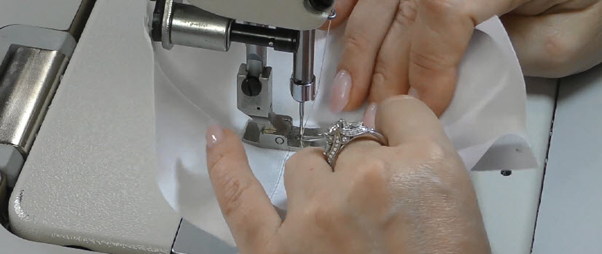
I pin the cup and the lining and stitch them along the upper cut with seam allowance of 0.7cm. Stitch on the wrong side to control easily the evenness of stitching and the accuracy of seam allowance. Make bar tacks at the start and the end.


Turn over the lining when stitching on both cups is made. We turn the foam upward and get the beautiful edge of the cup.

Now we should secure the lining along the cup. I align the curves and pin along the lower circle.

It is necessary to press the upper edge later.

We see that the upper cup is neat and beautiful when we fold lace. It also looks beautiful on the wrong side.


It is time to make the machine stitching to join the lining and the face of the cup. I start to stitch in a width of the presser foot from the upper edge to the opposite edge. I make no bar tacks. We should shape the cup after stitching and trim all unnecessary threads.


This is the cup which we get. I will do the same with the second cup.


Comments